
OK sewists, I have a fab new and completely FREE pattern hack for the Cocoon Jacket. With a couple of simple adjustments, you  too can be the Abominable Snowman. Ahem…. what I mean is that you too can convert your pattern into this snug Funnel Neck Cocoon Coat. I’ve worn this coat non-stop since I made it and especially love the way you can disappear down into the funnel neck for the height of cosiness.
The Cocoon Jacket is very simple to make in the first place (here is a link to my original post in case you missed it) and, in fact, this pattern hack is just as easy.
 For this coat, I cut a couple of sizes bigger than I usually wear, firstly to accommodate the thickness of the fur and secondly, so that I could comfortably wear a thick jumper underneath it. As the jacket sits originally, the front panels just meet at the front. However, I wanted more of a coat that would fasten so, a little bit of overlap was needed. I have ditched the neckline notches and added some width to the front panels. The lefthand side (which accommodates the buttons) needs to be a little wider than the right. So add on 11cm to the width of the lefthand front top and front bottom pattern pieces, and 7cm to the righthand front top and bottom pattern pieces as shown in the diagram on the right.
I also wanted the sleeves to be full length. If you put your sleeve and your cuff pattern pieces together and extend the line they follow by 15cm, as shown in the diagram, you can create a single pattern piece for a full length sleeve.
The finishing touch is the funnel neck that I have added for that extra cosy feel. This is super simple. I have just cut a long strip of fabric that is the length of the neckline minus 4cm. Mine was 52cm long (although this will vary with the size of the pattern you have cut). Choose the height of the funnel neck you want – I made mine 13cm. Cut double the height of the funnel neck – 26cm.
With right sides together, sew the funnel neck into the neckline and then fold down and catch in by hand on the inside. You can hide the ugly seam inside the collar.

 Finally on to the buttons. If you feel a bit nervous about tackling button holes, don’t let that put you off. If you have an automatic buttonhole function and foot on your machine that remains untouched, now is the time to get it out. It is unbelievably easy to use and has spectacular results.
Here are my tips for first-time buttonholers. I am using a Bernina 350 and the 3A foot:
First of all, make sure you do a test buttonhole (do not start straight on to your beautiful new garment.) Your test needs to be on a similar weight fabric to your garment.
 Start by threading your bobbin cotton through the finger in the bobbin case.
Measure the buttons you are going to use and add 2mm, then mark this on the buttonhole measure on your foot with the red slider. So if your button is 20mm, you set your slider to 22mm. If your buttons are very thick then just add a bit extra, maybe another millimetre or two.
Set your machine to the buttonhole function and sew in a straight line until the red line of the moving part is level with the pointer. Stop sewing and press the reverse button. This brings up “auto” on the screen which means that the length of the buttonhole is now programmed into your machine.
 Now just put your foot down and start sewing. Stop when the button hole is finished – you will know when this is because the machine itself stops. Now’s the time to test the button fits through the hole and make any adjustments needed.
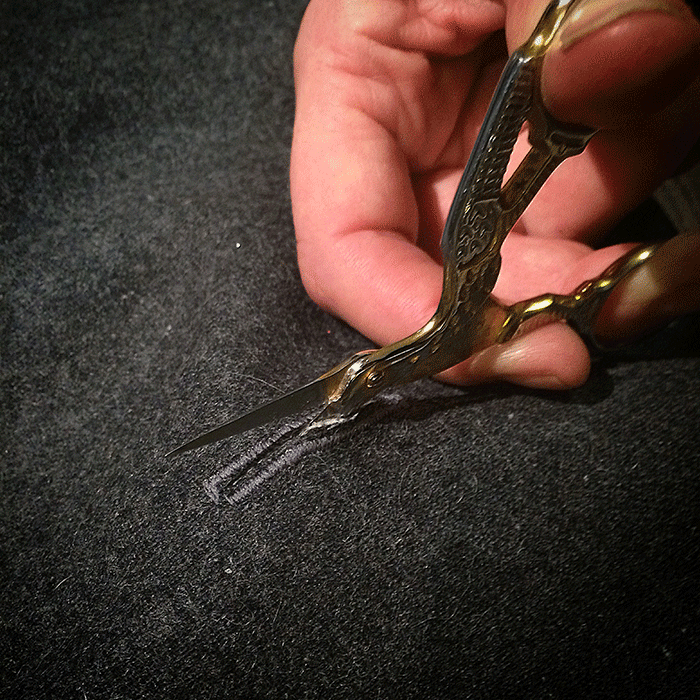
Use a seam ripper or some tiny scissors to cut your buttonhole open, being careful not to cut the stitching as you do it.
Buttons for women go on the left of the garment and buttonholes on the right. Mark with a ruler and tailors chalk where you want your buttonholes to go and off you go

 If you don’t have an automatic buttonhole function then the 4 step function you get on older machine also works well after a bit of trial and error to get the correct size. Or alternatively I have always been a fan of giant poppers which look great and are easy to sew on.
The fabric I have used is an amazing bonded faux fur from Fabworks. I think it was £12 / metre (but can’t be sure). It is thick and was hard work for my machine to get through at times but is extremely forgiving to work with. The best thing about it, which is not immediately clear from these photos, is that it is double-sided – on the reverse of the shaggy cream fur is a lovely grey marl felt. So I didn’t use the lining that is specified on the Cocoon Jacket pattern but just used the fabric as a single skin instead. Sew easy!
Stay warm, keep sewing and have a great Christmas!

