
I was just looking for a little project for my own girls the other day and I came up with these emoji christmas decorations! Emojis are everywhere at the moment and the kids love them! These are like traditional handsewn felt decorations that you often see but they are done on the machine, (and with the help of a bit of glue), which is of course much quicker. Take your pick from Father Christmas, Rudolph or the Angel.
 I’ve written out the instructions so that the kids themselves can follow them. There are stencils to download and you can use these to customise customise each decoration with heart eyes, tongues, smiles – make each one individual.
Click here to download the stencil pack. You can print this at home onto an A4 piece of paper and draw round them to create your felt shapes.
You will need :
Pen or soft pencil
Felt – red yellow, pink, black, white and blue.
Wadding or cotton wool
Glue – clear, rapid-dry glue is best
Red ribbon

To make the Rudolph emoji
1 – Print out your stencils and cut them out. Use the stencils to draw round onto your felt. Cut 2 yellow circles, 2 antlers, a tongue, a smile, a nose and 2 eyes of your choice.
2 – Use a decorative stitches on your machine to decorate your antlers. The stitching stops the antlers from being too floppy.
3 – Cut a piece of ribbon that is 15cm long and fold it in half.
4 – Pin the folded ribbon and the two antlers in place b ehind one of your yellow circles and then pin the other circle underneath. Make sure that the head of the pins are on the OUTSIDE otherwise you will sew them into your emoji and it could be a nasty shock for anyone who picks it up – ouch!
4 – Oversew round your emoji using a vari-overlock stitch or if you haven’t got this then a normal zigzag will do. On the way round, make sure you sew through the antlers and the ribbon to hold them in place. At the bottom, leave a gap of about 2cm open.
5 – Stuff your emoji with a little bit of wadding using the end of a pencil and then sew up the gap by hand. (When you stick the tongue on it will overlap just here and hide your hand stitching.)
6 – Glue the eyes, nose, mouth and tongue in place. Leave this to dry and there you have a lovely Rudolph emoji decoration.
.
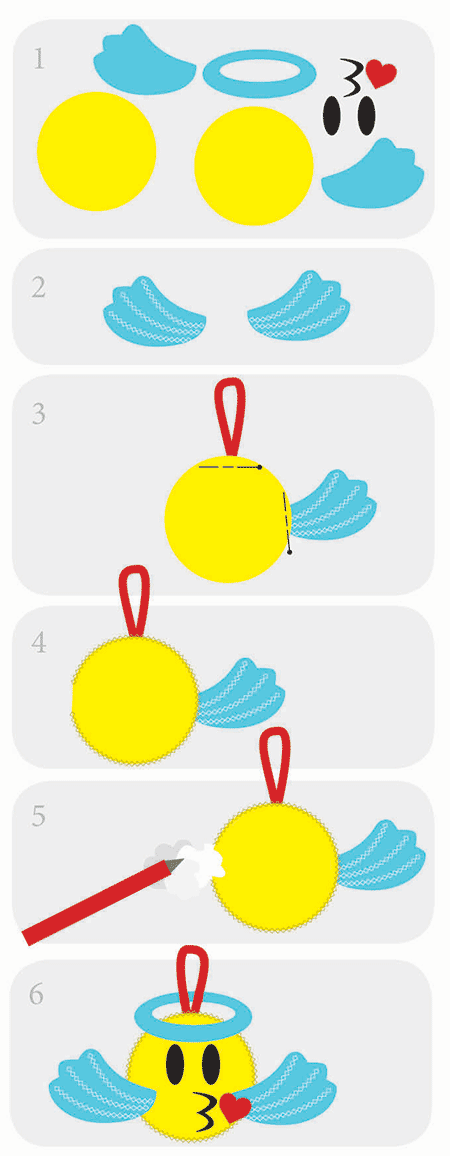
To make the Angel emoji
1 – Use your stencils again to draw onto your felt. Cut 2 yellow circles, 2 wings, one halo, a mouth, 2 eyes and a heart kiss.
2 – Use one of the decorative stitches on your sewing machine to make some pretty patterns on the wings. This stitching stops the wings from being too floppy.
3 – Cut a piece of ribbon that is 15cm long and fold it in half.
4 – Pin the folded ribbon  and one of the wings behind a yellow circles. Then pin another yellow circle behind that. Make sure that the head of the pins are on the OUTSIDE otherwise you will sew them into your emoji and it could be a nasty shock for anyone who picks it up – ouch!
4 – Oversew round the yellow circles using a vari-overlock stitch or if you haven’t got this then a normal zigzag will do. On the way round, make sure you sew through the ribbon and the wing to hold them in place. At the side, where the other wing will attach, leave a gap of about 2cm open.
5 – Stuff your emoji with a little bit of wadding using the end of a pencil and then sew up the gap by hand. (When you stick the other wing on it will overlap just here and hide your hand stitching.)
6 – Glue the eyes, mouth and kiss, halo and the second wing in place. Leave this to dry and there you have a lovely Christmas emoji angel.
.
.
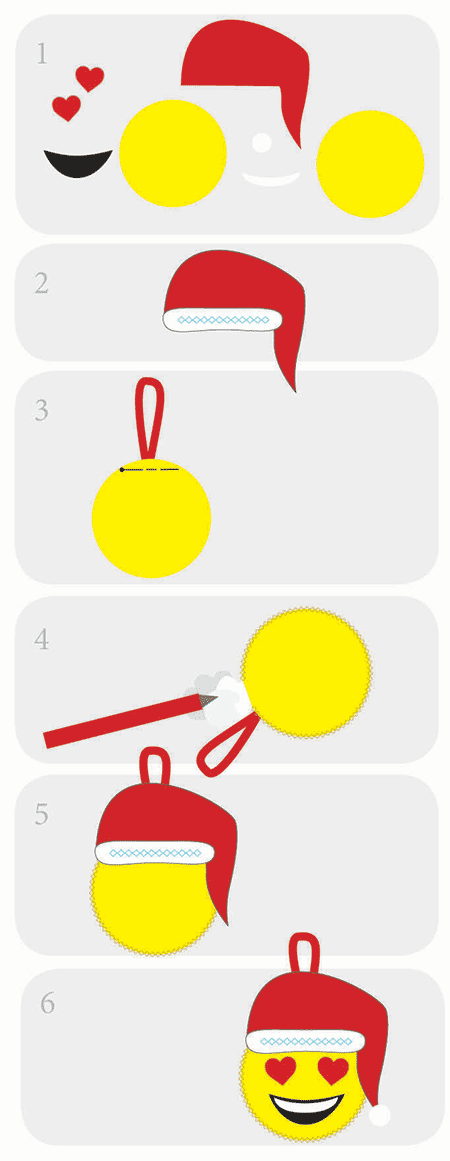
To make the Santa emoji
1 – Use your stencils to draw onto your felt. Cut 2 yellow circles, 1 red hat, one white bobble and hat trim, a smile, teeth and 2 eyes.
2 – Pin the trim onto the hat. Use one of the decorative stitches on your machine to sew them together.
3 – Cut a piece of ribbon that is 15cm long and fold it in half.
 4 – Pin the folded ribbon behind the hat and then pin the other circle underneath. Make sure that the head of the pins are on the OUTSIDE otherwise you will sew them into your emoji and it could be a nasty shock for anyone who picks it up – ouch!
4 – Oversew round the yellow circles using a vari-overlock stitch or if you haven’t got this then a normal zigzag will do. You might find it easier to fold the hat forwards while you do this so it isn’t in the way. On the way round, make sure you sew through the ribbon to hold it in place. At the top, behind the hat, leave a gap of about 2cm open.
5 – Stuff your emoji with a little bit of wadding using the end of a pencil and then sew up the gap by hand. (When you stick the hat on it will overlap just here and hide your hand stitching.)
6 – Glue the eyes, nose, mouth and hat bobble in place. Leave this to dry and your Santa emoji decoration is finished.


[…] Not a emoji pillow but check for cute christmas emojis – sewdifferent.co.uk […]